
In this blog post, we will explore a toy classification example using the Fashion MNIST dataset. We will discuss the limitations of the fastai DataBlock API and how learning about the Mid-level API can help overcome these limitations using Transforms, Pipeline, and Datasets. We will also cover the debugging steps involved in creating the Dataloaders for training image classifier & deploy the app using Gradio & HuggingFace spaces.
See the complete app Code & Space
- toc: true
- badges: true
- comments: true
- categories: [image-classification, machine-learning]
- image: images/chart-preview.png
Context
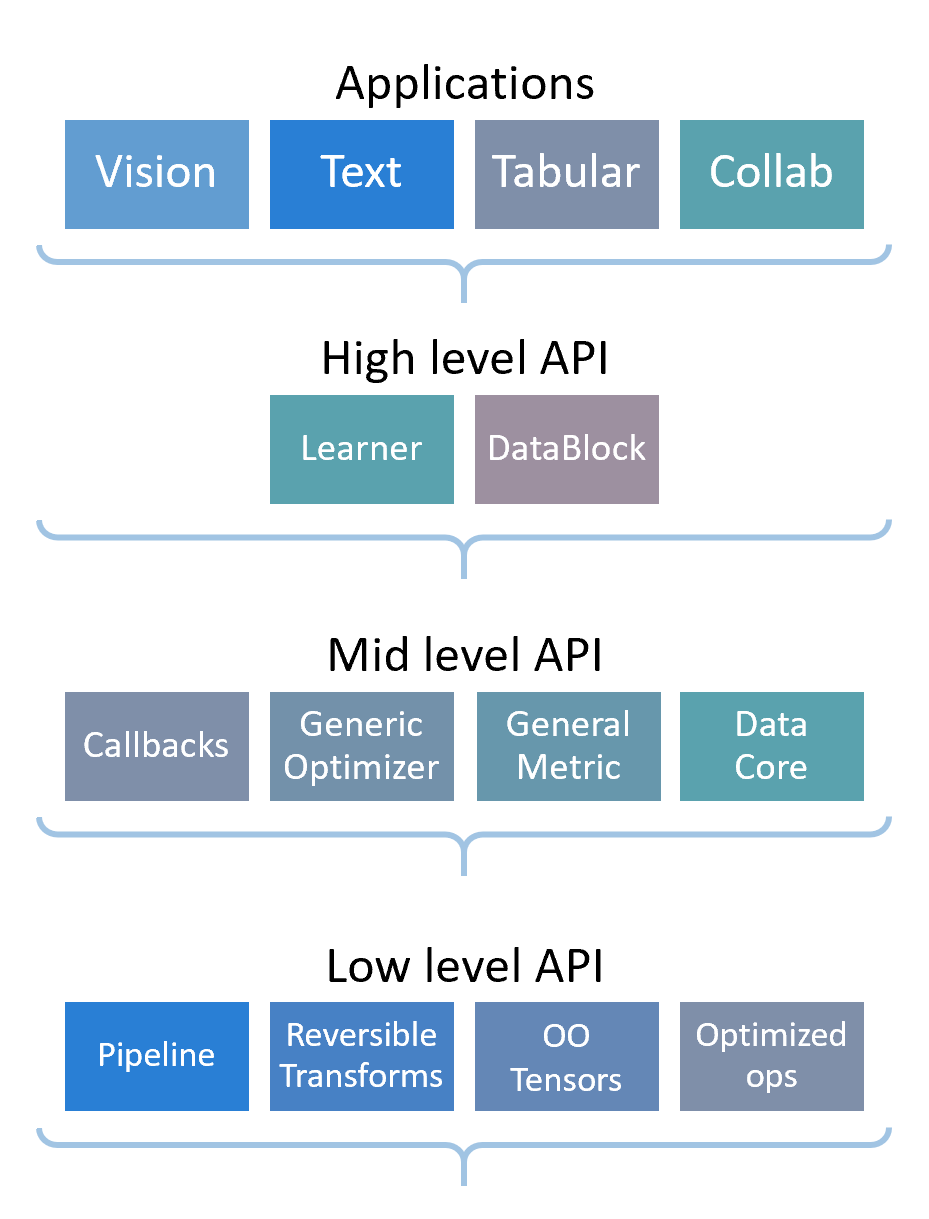
When working with the fastai library, we may encounter situations where the Data block API is not flexible enough to handle our specific data processing needs. In such cases, we can use fastai’s mid-level API, which provides a more comprehensive set of tools for processing data. The mid-level API includes a range of features such as Transforms, Pipeline, TfmdLists, Datasets, Callbacks, and General Optimizer. By using these, we can overcome the limitations of the Data block API and create more customized data processing pipelines to suit our specific use case.
To read more about Mid-Level API, please refer Chapter 11 - Data Munging with fastai’s Mid-Level API in fastbook.
In this post, I wanted to share a toy classification example using Fashion MNIST dataset where the DataBlock API is not flexibile and how learning about Mid-level API using Transforms, Pipeline and Datasets helped to create the Dataloaders for training the model. We will use the model to create a image classifier predicting the target class given an black & white image of a fashion apparel using Gradio and HuggingFace spaces. We will also cover the debugging steps involved at the relevant step.
The end to end workflow is as follows
Exploring the Dataset
- Download and load dataset with the name
fashion_mnistfrom https://huggingface.co/datasets/fashion_mnist using HuggingFace datasets library.
Fashion-MNIST is a dataset of Zalando’s article images—consisting of a training set of 60,000 examples and a test set of 10,000 examples. Each example is a 28x28 grayscale image, associated with a label from 10 apparels such as t-shirt, ankle boot,
- Explore the dataset using
load_dataset_builderinspecting the dataset info such as description, features, splits etc
name='fashion_mnist'
ds_builder = load_dataset_builder(name)print(ds_builder.info.description)Fashion-MNIST is a dataset of Zalando's article images—consisting of a training set of
60,000 examples and a test set of 10,000 examples. Each example is a 28x28 grayscale image,
associated with a label from 10 classes. We intend Fashion-MNIST to serve as a direct drop-in
replacement for the original MNIST dataset for benchmarking machine learning algorithms.
It shares the same image size and structure of training and testing splits.
print(ds_builder.info.features){'image': Image(decode=True, id=None), 'label': ClassLabel(names=['T - shirt / top', 'Trouser', 'Pullover', 'Dress', 'Coat', 'Sandal', 'Shirt', 'Sneaker', 'Bag', 'Ankle boot'], id=None)}print(ds_builder.info.splits){'train': SplitInfo(name='train', num_bytes=31296655, num_examples=60000, shard_lengths=None, dataset_name=None), 'test': SplitInfo(name='test', num_bytes=5233818, num_examples=10000, shard_lengths=None, dataset_name=None)}ds_builder.info.features['label']ClassLabel(names=['T - shirt / top', 'Trouser', 'Pullover', 'Dress', 'Coat', 'Sandal', 'Shirt', 'Sneaker', 'Bag', 'Ankle boot'], id=None)ds_builder.info.features['label'].int2str(9)'Ankle boot'- Load the dataset from the Hugging Face Hub specifying the name.
dset = load_dataset(name)This is a DatasetDict containing a train and test dataset dictionary within this object.
dsetDatasetDict({
train: Dataset({
features: ['image', 'label'],
num_rows: 60000
})
test: Dataset({
features: ['image', 'label'],
num_rows: 10000
})
})- We can inspect the individual item within train and test and the different labels.
dset['train'][0], dset['test'][0]({'image': <PIL.PngImagePlugin.PngImageFile image mode=L size=28x28>,
'label': 9},
{'image': <PIL.PngImagePlugin.PngImageFile image mode=L size=28x28>,
'label': 9})Create fastai DataLoaders
We eventually want to create Datasets object in fastai from HuggingFace Dataset. We will first attempt with the the high level DataBlock API and then transition to fastai Datasets.
DataBlock is a high level API in fastai allowing the user to define the standard steps to prepare the data for deep learning model.
Steps involved to prepare the data - Identify the types of inputs/targets for your data and define them as “Blocks”. - Specify how to fetch and define any transformations that need to be applied to the inputs using the “get_x” function. - Specify how to fetch and define any transformations that need to be applied to the targets using the “get_y” function. - Split the data into training and validation sets using the “splitter” function. - Apply any additional transformations to the items using the “item_tfms” function. - Apply any additional transformations to the batches using the “batch_tfms” function.
Let’s create training and test sets.
train, test = dset['train'], dset['test']Create an Image from argument using PILImageBW.create function
im = PILImageBW.create(train[0]['image'])Display the image using show method
im.show()
Let’s examine the type of the features (ie Image) and label
type(train[0]['image'])PIL.PngImagePlugin.PngImageFileLet’s examine the first 3 training samples
train[:3]{'image': [<PIL.PngImagePlugin.PngImageFile image mode=L size=28x28>,
<PIL.PngImagePlugin.PngImageFile image mode=L size=28x28>,
<PIL.PngImagePlugin.PngImageFile image mode=L size=28x28>],
'label': [9, 0, 0]}The type of label is an int but since fastai also performs Categorize transform we can create a separate target which contains the original apparel name. This can be achieved using ClassLabel.int2str method.
classLabel = ClassLabel(names=['T - shirt / top', 'Trouser', 'Pullover', 'Dress', 'Coat', 'Sandal', 'Shirt', 'Sneaker', 'Bag', 'Ankle boot'], id=None)

def add_target(x:dict):
    x['target'] = classLabel.int2str(x['label'])
    return x

train = train.map(lambda x: add_target(x))
valid = test.map(lambda x: add_target(x))train[:3], valid[:3]({'image': [<PIL.PngImagePlugin.PngImageFile image mode=L size=28x28>,
<PIL.PngImagePlugin.PngImageFile image mode=L size=28x28>,
<PIL.PngImagePlugin.PngImageFile image mode=L size=28x28>],
'label': [9, 0, 0],
'target': ['Ankle boot', 'T - shirt / top', 'T - shirt / top']},
{'image': [<PIL.PngImagePlugin.PngImageFile image mode=L size=28x28>,
<PIL.PngImagePlugin.PngImageFile image mode=L size=28x28>,
<PIL.PngImagePlugin.PngImageFile image mode=L size=28x28>],
'label': [9, 2, 1],
'target': ['Ankle boot', 'Pullover', 'Trouser']})Now we can concatenate training and validation datasets into a single set of items which can be passed to fastai Datasets with index from 60000 to 70000 set aside as validation set.
concat_dsets = concatenate_datasets([train, valid])concat_dsetsDataset({
features: ['image', 'label', 'target'],
num_rows: 70000
})Attempting to use DataBlock
Let’s first create a DataBlock and then learn how to create Datasets. In order to inform fastai on how to turn the data into DataLoaders object, 4 key pieces of info are needed. 1. the kind of data used for inputs and the target 2. Getters for the list of items 3. Labeling the items 4. Validation set creation
Tip
It’s best to create DataBlock in an iterative manner and running datablock.summary to understand the pieces that fastai adds behind the scenes.
def get_image_attr(x): return x['image']
def get_target_attr(x): return x['target']Image.fromarray(array(train[0]['image']))
def image2tensor(img):
    "Transform image to byte tensor in `c*h*w` dim order."
    res = tensor(img)
    if res.dim()==2: res = res.unsqueeze(-1)
return res.permute(2,0,1)type(image2tensor(train[0]['image']))torch.TensorWe will discuss image2tensor function when we discuss Attempting with Datasets
This shows how to specify the indices that need to be part of validation set. Indices 6, 7, 8 & 9 are in validation and rest are in training set.
IndexSplitter(valid_idx=L(range(6, 10)))(concat_dsets)((#69996) [0,1,2,3,4,5,10,11,12,13...], (#4) [6,7,8,9])DataBlock definition is as follows
dblock = DataBlock(blocks=(ImageBlock(cls=PILImageBW), CategoryBlock),
                   get_x=Pipeline([get_image_attr, image2tensor]),
                   get_y=get_target_attr,
                   splitter=IndexSplitter(valid_idx=L(range(60000, 70000))),
                   )
Run the DataBlock.summary to understand how fastai set up the data pipeline and perform the necessary transforms.
#Output cleared
#dblock.summary(concat_dsets)
Traceback while running dblock.summary(concat_dsets)
Setting-up type transforms pipelines
Collecting items from Dataset({
    features: ['image', 'label', 'target'],
    num_rows: 70000
})
Found 70000 items
2 datasets of sizes 60000,10000
Setting up Pipeline: get_image_attr -> image2tensor -> PILBase.create
---------------------------------------------------------------------------
KeyError                                  Traceback (most recent call last)
~/miniconda3/envs/fastai/lib/python3.9/site-packages/PIL/Image.py in fromarray(obj, mode)
   2812         try:
-> 2813             mode, rawmode = _fromarray_typemap[typekey]
   2814         except KeyError as e:

KeyError: ((1, 1, 28), '|u1')
Essentially the data pipeline is as follows - Get the image attribute from the item, Convert the image to tensor. But fastai also adds the PILBase.create since we specified ImageBlock as our independent variable. This caused an issue KeyError: ((1, 1, 28), '|u1') due to Image.fromarray function used in PILBase.create. From https://stackoverflow.com/questions/57621092/keyerror-1-1-1280-u1-while-using-pils-image-fromarray-pil > Pillow’s fromarray function can only do a MxNx3 array (RGB image), or an MxN array (grayscale).
- Internally fastai calls
load_imagewith the item during the data pipeline creation as part ofPILBase.createwhich fastai adds by default if we specifyImageBlockas part of blocks section in the DataBlock.
def load_image(fn, mode=None):
    "Open and load a `PIL.Image` and convert to `mode`"
    im = Image.open(fn)
    im.load()
    im = im._new(im.im)
    return im.convert(mode) if mode else im
load_image requires a filename but dataset already is in PIL.PngImagePlugin.PngImageFile
Image.open(train[0]['image']) will lead to the following error from pillow library.
---------------------------------------------------------------------------
AttributeError                            Traceback (most recent call last)
<ipython-input-18-ed0e9de325b8> in <module>
----> 1 Image.open(train[0]['image'])

1 frames
/usr/local/lib/python3.8/dist-packages/PIL/Image.py in __getattr__(self, name)
    544             )
    545             return self._category
--> 546         raise AttributeError(name)
    547
    548     @property
Attempt with MidLevel API Datasets
We want to convert the Image of size [28 ,28] into [1, 28, 28] as our end goal and decided to perform the item transforms using Mid Level API instead. - Datasets in MidLevel API provides more flexibility and full control over the individual item transforms performed.
Datasets is part of MidLevel API allowing the user to customize the steps involved in data processing that are not possible with DataBlockAPI
Datasets need the following pieces of information - raw items - the list of transforms that builds our inputs from the raw items - the list of transforms that builds our targets from the raw items - the split for training and validation
For a deeper dive, refer loading the data with mid level api section on Training Imagenette tutorial and Wayde Gilliam blog post
Let’s iterate on the individual pieces of info.
Let’s investigate the item transforms that we need for the Image. PyTorch Model expects the items to of type torch.Tensor. So I used ToTensor but it did not convert to tensors as I expected for the Image of type PIL.PngImagePlugin.PngImageFile. So I created img2tensor instead.
type(train[0]['image'])PIL.PngImagePlugin.PngImageFiletype(ToTensor()(train[0]['image']))PIL.PngImagePlugin.PngImageFileReferred what fastai does underneath using the source code. This is the function that takes the image and converts the image to a byte tensor of shape c*h*w ie channel x height x width
def image2tensor(img):
    "Transform image to byte tensor in `c*h*w` dim order."
    res = tensor(img)
    if res.dim()==2: res = res.unsqueeze(-1)
return res.permute(2,0,1)type(image2tensor(train[0]['image']))torch.TensorI created my own version of it in img2tensor
def img2tensor(im: Image.Image):
return TensorImageBW(array(im)).unsqueeze(0)img2tensor(train[0]['image']).shapetorch.Size([1, 28, 28])tensor(train[0]['image']).unsqueeze(-1).permute(2,0,1).shapetorch.Size([1, 28, 28])TensorImageBW(array(im)).unsqueeze(0).shapetorch.Size([1, 28, 28])test_eq([1, 28, 28], img2tensor(train[0]['image']).shape)
test_eq([1, 28, 28], image2tensor(train[0]['image']).shape)As you can see both image2tensor and img2tensor behaves the same way.Now the input item is ready. Let’s look at the target.
concat_dsetsDataset({
features: ['image', 'label', 'target'],
num_rows: 70000
})fasti internally converts the label and encodes them into numbers by creating a vocabulary of labels using Categorize transform.
Categorize(vocab=ds_builder.info.features['label'].names, sort=False)Categorize -- {'vocab': ['T - shirt / top', 'Trouser', 'Pullover', 'Dress', 'Coat', 'Sandal', 'Shirt', 'Sneaker', 'Bag', 'Ankle boot'], 'sort': False, 'add_na': False}:
encodes: (Tabular,object) -> encodes
(object,object) -> encodes
decodes: (Tabular,object) -> decodes
(object,object) -> decodesCreate the Datasets definition as follows
splits = IndexSplitter(valid_idx=L(range(60000, 70000)))(concat_dsets)
dsets = Datasets(concat_dsets,
                 [[get_image_attr],
                  [get_target_attr, Categorize]],
                 splits=splits)
Define the item transformations and batch transformations
item_tfms = [img2tensor] # convert PILImage to tensors
batch_tfms = [IntToFloatTensor] # convert the int tensors from images to floats, and divide every pixel by 255
dls = dsets.dataloaders(after_item=item_tfms, after_batch=batch_tfms, bs=64, num_workers=8)
Visualize the items in a batch
dls.show_batch()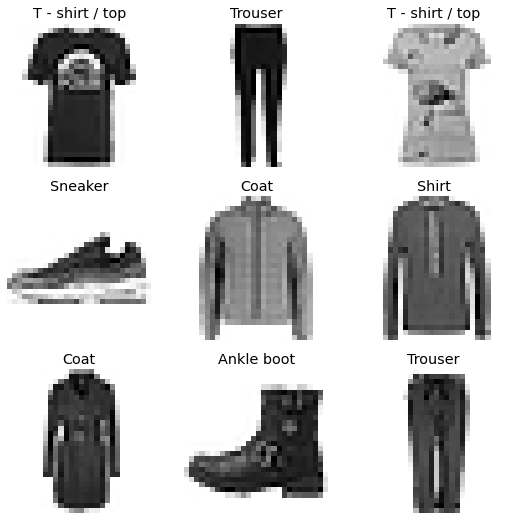
Verify the items and their shapes in a single batch
xb, yb = dls.one_batch()xb.shape, yb.shape(torch.Size([64, 1, 28, 28]), torch.Size([64]))dls.c # 10 classes as targets10dls.vocab # targets vocabulary['Ankle boot', 'Bag', 'Coat', 'Dress', 'Pullover', 'Sandal', 'Shirt', 'Sneaker', 'T - shirt / top', 'Trouser']Train the Model
For training a image classification model, resnet architecture (a form on convolution neural network) is used as our backbone and fully connected (fc) linear layer as our head. In order for the linear layer to predict the outputs as one of the classes, pass the number of classes in order to configure the final layer. For overview review this resource about transfer learning and fine tuning.
Review the model layers
#gpu required
model = resnet34(num_classes=dls.c).cuda()
#gpu required
model.avgpool, model.fc# Uncomment this line to validate if the model accepts single batch as input
# model(xb)We can access the convolutional layers as attributes of the model.
Input to the convolutional layer is set as 3 channel (RGB) image but the images used as inputs are single channel images. Let’s update the input channel to single channel.
#gpu required
model.conv1
Conv2d(3, 64, kernel_size=(7, 7), stride=(2, 2), padding=(3, 3), bias=False)#gpu required
model.conv1 = nn.Conv2d(in_channels=1, out_channels=64, kernel_size=(7, 7), stride=(2, 2), padding=(3, 3), bias=False)#gpu required
model.cuda();#gpu required
model(xb);Learner
Learner is a class that combines the ingredients such as data, model and metrics used to train a model.
learn = Learner(dls, model, metrics=accuracy)pretrained=False type setting is used since the fashnion mnist is not similar dataset as Imagenet so keeping all the layers are trainable. If in case pretrained=True, we may want to freeze the layers except the head and do a bit of fine tuning the head first followed by unfreeze & then train all the layers.
Review the learner summary to know about the input shape, output shape, different layers involved, parameters, trainable, Optimizer used and loss function used.
learn.summary()ResNet (Input shape: 64 x 1 x 28 x 28)
============================================================================
Layer (type) Output Shape Param # Trainable
============================================================================
64 x 64 x 14 x 14
Conv2d 3136 True
BatchNorm2d 128 True
ReLU
____________________________________________________________________________
64 x 64 x 7 x 7
MaxPool2d
Conv2d 36864 True
BatchNorm2d 128 True
ReLU
Conv2d 36864 True
BatchNorm2d 128 True
Conv2d 36864 True
BatchNorm2d 128 True
ReLU
Conv2d 36864 True
BatchNorm2d 128 True
Conv2d 36864 True
BatchNorm2d 128 True
ReLU
Conv2d 36864 True
BatchNorm2d 128 True
____________________________________________________________________________
64 x 128 x 4 x 4
Conv2d 73728 True
BatchNorm2d 256 True
ReLU
Conv2d 147456 True
BatchNorm2d 256 True
Conv2d 8192 True
BatchNorm2d 256 True
Conv2d 147456 True
BatchNorm2d 256 True
ReLU
Conv2d 147456 True
BatchNorm2d 256 True
Conv2d 147456 True
BatchNorm2d 256 True
ReLU
Conv2d 147456 True
BatchNorm2d 256 True
Conv2d 147456 True
BatchNorm2d 256 True
ReLU
Conv2d 147456 True
BatchNorm2d 256 True
____________________________________________________________________________
64 x 256 x 2 x 2
Conv2d 294912 True
BatchNorm2d 512 True
ReLU
Conv2d 589824 True
BatchNorm2d 512 True
Conv2d 32768 True
BatchNorm2d 512 True
Conv2d 589824 True
BatchNorm2d 512 True
ReLU
Conv2d 589824 True
BatchNorm2d 512 True
Conv2d 589824 True
BatchNorm2d 512 True
ReLU
Conv2d 589824 True
BatchNorm2d 512 True
Conv2d 589824 True
BatchNorm2d 512 True
ReLU
Conv2d 589824 True
BatchNorm2d 512 True
Conv2d 589824 True
BatchNorm2d 512 True
ReLU
Conv2d 589824 True
BatchNorm2d 512 True
Conv2d 589824 True
BatchNorm2d 512 True
ReLU
Conv2d 589824 True
BatchNorm2d 512 True
____________________________________________________________________________
64 x 512 x 1 x 1
Conv2d 1179648 True
BatchNorm2d 1024 True
ReLU
Conv2d 2359296 True
BatchNorm2d 1024 True
Conv2d 131072 True
BatchNorm2d 1024 True
Conv2d 2359296 True
BatchNorm2d 1024 True
ReLU
Conv2d 2359296 True
BatchNorm2d 1024 True
Conv2d 2359296 True
BatchNorm2d 1024 True
ReLU
Conv2d 2359296 True
BatchNorm2d 1024 True
AdaptiveAvgPool2d
____________________________________________________________________________
64 x 10
Linear 5130 True
____________________________________________________________________________
Total params: 21,283,530
Total trainable params: 21,283,530
Total non-trainable params: 0
Optimizer used: <function Adam>
Loss function: FlattenedLoss of CrossEntropyLoss()
Callbacks:
- TrainEvalCallback
- CastToTensor
- Recorder
- ProgressCallbackLearning rate, a hyperparameter used for training can be determined using learning rate finder function in fastai
learn.lr_find()SuggestedLRs(valley=0.0004786300996784121)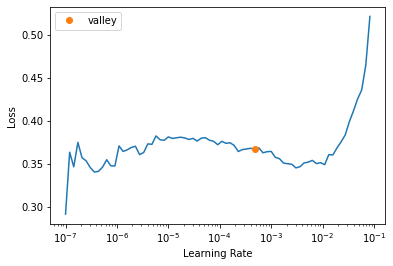
Train the deep learning model with 6 epochs and with the learning rate obtained from previous step
learn.fit_one_cycle(6, 5e-3)| epoch | train_loss | valid_loss | accuracy | time |
|---|---|---|---|---|
| 0 | 0.350417 | 0.380862 | 0.860200 | 01:17 |
| 1 | 0.350359 | 0.350519 | 0.867500 | 01:18 |
| 2 | 0.266588 | 0.297127 | 0.889900 | 01:19 |
| 3 | 0.215826 | 0.248561 | 0.909700 | 01:16 |
| 4 | 0.173092 | 0.230798 | 0.918000 | 01:18 |
| 5 | 0.139866 | 0.226217 | 0.922900 | 01:17 |
Model is trained with an accuracy of 92.3%.
Exporting the trained model
Tip
Avoid using lambda as Getters during data processing in order to export the model correctly.
learn.export(fname=‘export.pkl’) will lead to following Pickling error if lambda is used in the Data pipeline
dsets = Datasets(concat_dsets, [[lambda x: x['image']], [lambda x: x['label'], Categorize]], splits=splits)PicklingError: Can’t pickle <function
::: {#cell-119 .cell quarto-private-1='{"key":"vscode","value":{"languageId":"python"}}'}
``` {.python .cell-code}
learn.export(fname='export.pkl')
:::
Inference
Now load the learner from the exported model. Predict the item ie image using Learner.predict. This function performs the necessary transforms on the item used as part of training using the learner.
item, expected = valid[0]['image'], valid[0]['target']; item, expected(<PIL.PngImagePlugin.PngImageFile image mode=L size=28x28>, 'Ankle boot')learn.predict(item)('9',
tensor(9),
tensor([5.0262e-13, 4.2399e-12, 1.5671e-10, 1.6854e-12, 4.1097e-14, 1.6369e-06,
1.2831e-10, 1.0092e-05, 1.8003e-10, 9.9999e-01]))learn.dls.after_item, learn.dls.after_batch(Pipeline: img2tensor,
Pipeline: IntToFloatTensor -- {'div': 255.0, 'div_mask': 1})Recreating Learner.predict from the source code
We can run learn.predict?? to examine what fastai does and review each line carefully.
def predict(self, item, rm_type_tfms=None, with_input=False):
        dl = self.dls.test_dl([item], rm_type_tfms=rm_type_tfms, num_workers=0)
        inp,preds,_,dec_preds = self.get_preds(dl=dl, with_input=True, with_decoded=True)
        i = getattr(self.dls, 'n_inp', -1)
        inp = (inp,) if i==1 else tuplify(inp)
        dec = self.dls.decode_batch(inp + tuplify(dec_preds))[0]
        dec_inp,dec_targ = map(detuplify, [dec[:i],dec[i:]])
        res = dec_targ,dec_preds[0],preds[0]
        if with_input: res = (dec_inp,) + res
        return res
Converting the item by applying the transforms and create a dataloader out of it.
dl = learn.dls.test_dl([item]); dl<fastai.data.core.TfmdDL>Internally learn.predict calls the get_preds method which accepts data loader and returns the input, predictions, the decoded predictions. This applies the same transforms done during training applied on the input during inference.
inp, preds, _, decoded_preds = learn.get_preds(dl=dl, with_input=True, with_decoded=True)Examine the input shape and type
inp.shape, type(inp)(torch.Size([1, 1, 28, 28]), fastai.torch_core.TensorImageBW)tuplify(decoded_preds)(tensor([9]),)type(learn.dls.decode_batch((inp,) + tuplify(decoded_preds))), len(learn.dls.decode_batch((inp,) + tuplify(decoded_preds)))(fastcore.foundation.L, 1)image, prediction = learn.dls.decode_batch((inp,) + tuplify(decoded_preds))[0]; prediction'9'prediction, decoded_preds('9', tensor([9]))Let’s examine fastai transforms done after item and after batch.
learn.dls.after_item, learn.dls.after_batch(Pipeline: img2tensor,
Pipeline: IntToFloatTensor -- {'div': 255.0, 'div_mask': 1})type_tfms = Pipeline([get_image_attr])
item_tfms = Pipeline([img2tensor])
batch_tfms = Pipeline([IntToFloatTensor])train[0]{'image': <PIL.PngImagePlugin.PngImageFile image mode=L size=28x28>,
'label': 9,
'is_valid': False}img = type_tfms(train[0]);img.shape(28, 28)item_tfms(img).shapetorch.Size([1, 28, 28])batch_tfms(item_tfms(img).cuda()).shapetorch.Size([1, 28, 28])From the previous steps, we can uncover fastai magic such as transforms happening behind the scenes.
Gradio app deployment
Let’s deploy the trained model and inference functionality in Gradio app and host the app in HuggingFace Space.
Steps followed - Create a new space in HF Space (Profile -> New Space) - Upload the exported model export.pkl - Move all the necessary functions used as part of the transforms along with the inference provided below. This includes all the getters. - Add all the dependencies to requirements.txt - Create a gradio interface passing the classify function, specifying the inputs(Image) and outputs(Label) - See the complete Code & Space
from fastai.vision.core import PILImageBW, TensorImageBW
from datasets import ClassLabel
import gradio as gr
from fastai.learner import load_learner

def get_image_attr(x): return x['image']
def get_target_attr(x): return x['target']

def img2tensor(im: Image.Image):
    return TensorImageBW(array(im)).unsqueeze(0)

classLabel = ClassLabel(names=['T - shirt / top', 'Trouser', 'Pullover', 'Dress', 'Coat', 'Sandal', 'Shirt', 'Sneaker', 'Bag', 'Ankle boot'], id=None)

def add_target(x:dict):
    x['target'] = classLabel.int2str(x['label'])
    return x

learn = load_learner('export.pkl', cpu=True)

def classify(inp):
    img = PILImageBW.create(inp)
    item = dict(image=img)
    pred, _, _ = learn.predict(item)
return classLabel.int2str(int(pred))fname='shoes.jpg'
classify(fname)'Ankle boot'fname1 = 't-shirt.jpg'
classify(fname1)'T - shirt / top'Note: This is my project write up for WalkWithFastai revisited course as one of my goal for this course is to get comfortable with low level API, debug issues diving into the source, uncovering the fastai magic. Thanks to Zach Mueller for an excellent course.
References
- https://store.walkwithfastai.com/walk-with-fastai-revisited
- https://walkwithfastai.com/MNIST
- https://github.com/fastai/fastbook/blob/master/11_midlevel_data.ipynb